User Info
EN | Purpose, features, utilization of the UPPS! Extension Smart Insert (IN)
Page overview
Who is this documentation for?
You are a Polarion user responsible for creating Work Item content.
Prerequisites
Before reading this documentation you should be familiar with the following:
- Creation of Work Item content.
- The concept of LiveLinks and Cross-References in Polarion.
What you will learn
After reading this documentation, you will be able to:
- Understand the purpose and concept of the Smart Insert.
- Use the Smart Insert to search or create content and insert it to Polarion text fields.
Introduction
The Smart Insert allows you to generate and insert content, such as timestamps, mentions, and cross-referenced Work Items directly while typing in Polarion text fields (e.g. Work Item Description, Text Custom Field, Comment Thread).
You can activate the Smart Insert by typing any configured group symbol (such as %, #, or @) while editing a text field. This opens the Smart Insert menu, which displays the different type of content which can be generated and inserted into your text field.
Alternatively, you can press Ctrl + Space to open the Smart Insert menu. This displays all available symbols, which you can then select to insert the desired type of content.
Use cases
Search and insert a Work Item as a cross-reference
Imagine you are working in a Live Document that represents the architectural design of a mechatronic product under development, namely, a vehicle radio key. In this document, under the heading System Functions, you use the Work Item type F (Function) to describe the system functions of the radio key. Elsewhere in the same Live Document, under the heading Verification Criteria, you use the Work Item type VC (Verification Criterion) to define the verification criteria that must be applied when testing these system functions.
To comply with the relevant standards, you must list the associated verification criteria as cross-references in the description field of each function. With the Smart Insert, this becomes effortless.
Insert the current date and your name into a Polarion field according to a specific format
Imagine you are working in a Live Document containing the imported customer requirements specification for a mechatronic product your company is to develop and delive, again, a vehicle radio key. In this document, the customer requirements are represented as Work Items of type C (Customer Requirement). To ensure that any questions that arise can be clarified with the customer via roundtrip, each Work Item includes a custom field called Outgoing Comment. It is required that anyone who encounters ambiguities while assessing a requirement must use this field to raise their questions, first entering the current date and their name in a specific format, followed by their question(s) for the customer.
Enter user names correctly and in full in a Polarion field
Imagine you are commenting a Work Item in the Work Item Form Layout and want to mention the names of several colleagues in the comment thread. Naturally, you might not remember the exact spelling of their first and last names, or you may not even know all of them. With Smart Insert, all it takes is a few simple clicks.
Instructions for use
Preconditions
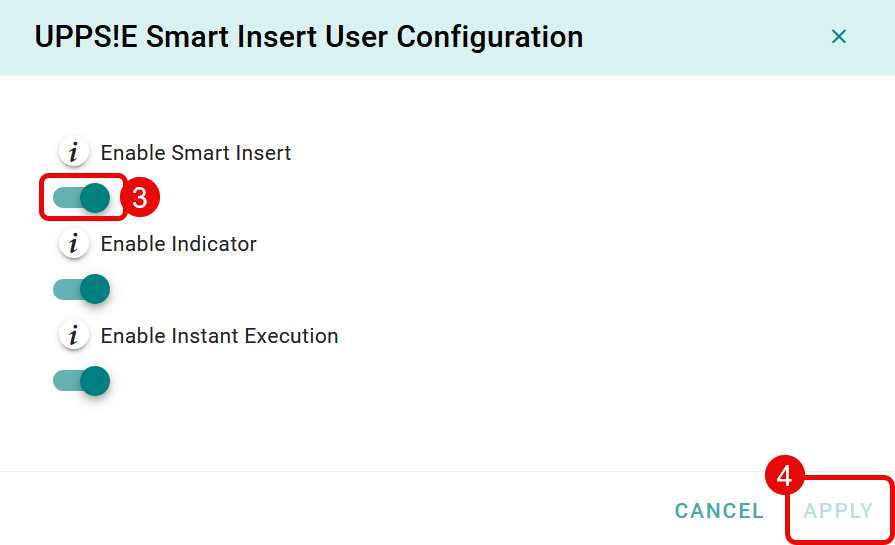
To use the Smart Insert in your current project, the extension must be enabled. To verify whether the Smart Insert is activated, follow these steps:
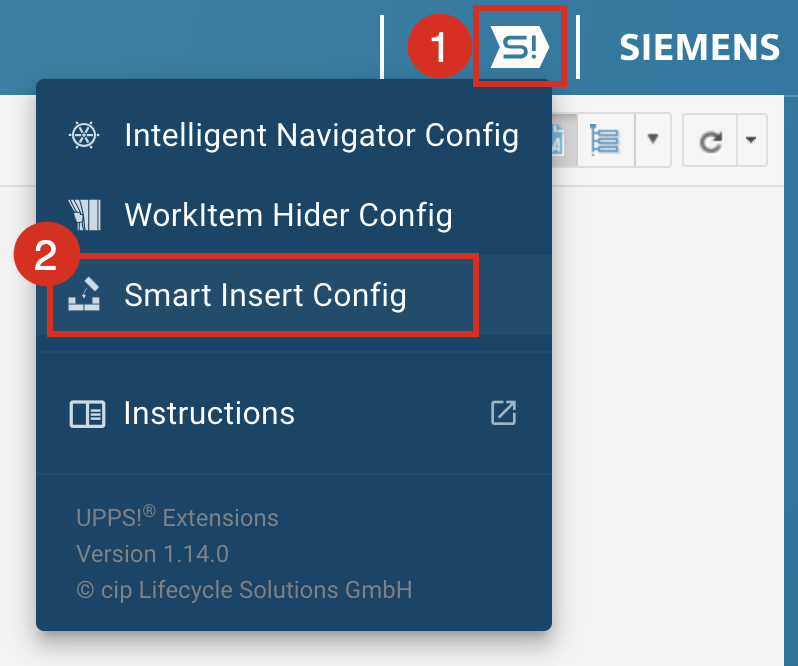
1. Click the UPPS! Extensions icon in the Polarion navigation header.
2. Select Smart Insert Config.

3. Ensure that Enable Smart Insert is toggled on. If it is disabled, switch it on.
4. Click APPLY to save changes.
Open the Smart Insert Menu
To start using the Smart Insert, click in any text field of Polarion (e.g. Work Item Description, Text Custom Fields, Comment Thread).
If the Smart Insert is available in that field, the Smart Insert icon in Polarion navigation header will be highlighted as shown below:

Next, type in any configured group symbol (e.g. %, #, or @) or press Ctrl + Space to activate the Smart Insert. The Smart Insert Menu will appear near your cursor.
Smart Insert Menu overview
Once the Smart Insert Menu is displayed, you can use the mouse or the available keyboard shortcuts to navigate through the different content, select one, and insert it into your text field.
As you type, the Smart Insert will automatically filter and display the matching results and suggestions.

After selecting the desired content, it will be inserted into the text field.

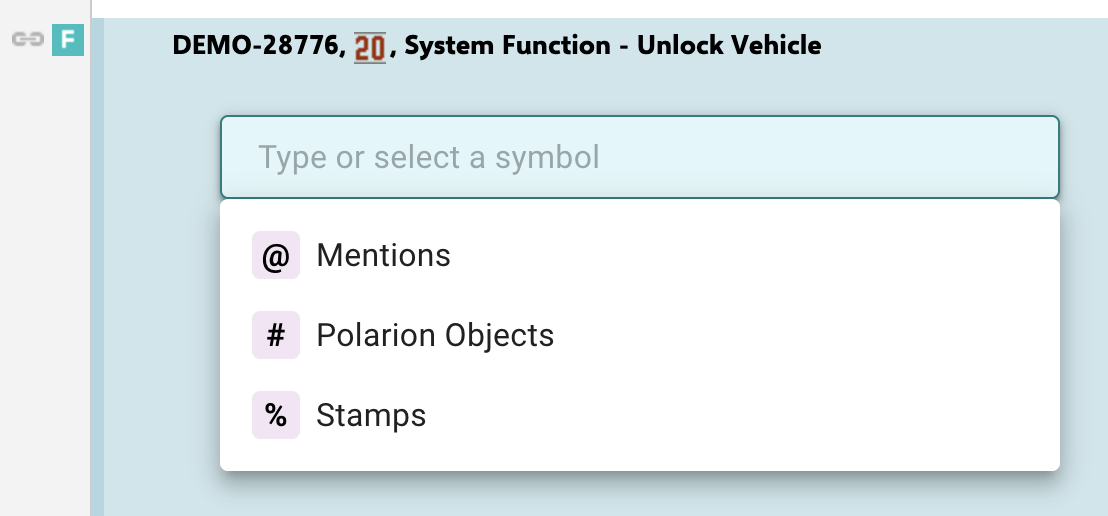
Predefined Group Symbols
By default, the following group symbols are available for use with the Smart insert:
@Mentions: Lists all users of the current project. Selecting a user inserts a mention (e.g.,@Max Mustermann (maa)).-
#Polarion Objects: Lists Work Items, LiveDocs, or Test Runs. You can filter the list and insert the selected object as a Cross-Reference or Live Link. -
%Stamps: Generates and lists various time stamps, with or without user information, and allows you to insert the chosen one.
Note that the available group symbols in your project may differ if your system or project administrator has extended or customized the default configuration.
Keyboard shortcuts
Use the following shortcuts to start working with the Smart Insert and to navigate through the Smart Insert menu.
| Shortcut | Action | Description |
|---|---|---|
%, #, or @ (or any configured symbol) |
Opens Category Options |
Opens the Smart Insert menu at the current cursor position and displays the types of content assigned to the symbol. |
Ctrl + Space |
Open Smart Insert Menu |
Opens the Smart Insert menu at the current cursor position and lists all available symbols. |
↑ / ↓ (Arrow Keys) |
Navigate vertically |
Move up or down through the available menu options. |
Enter |
Select or Advance | Selects the highlighted menu option or inserts the chosen item. |
| Mouse Click | Select | Select an item from the menu using the mouse. |
Tab |
Advance | Move to the next menu option. |
Shift + Backspace or Shift + Tab |
Go Back | Return to the previous menu option. |
Esc |
Close |
Cancel the Smart Insert process and close the Smart Insert menu. |
User settings
You can configure the Smart Insert to match your personal preferences. To access the user settings:
- Open the UPPS! Extensions Menu in the Polarion Navigation Header.
- Select Smart Insert Config.
The User Configuration dialog opens, which provides the following user settings:
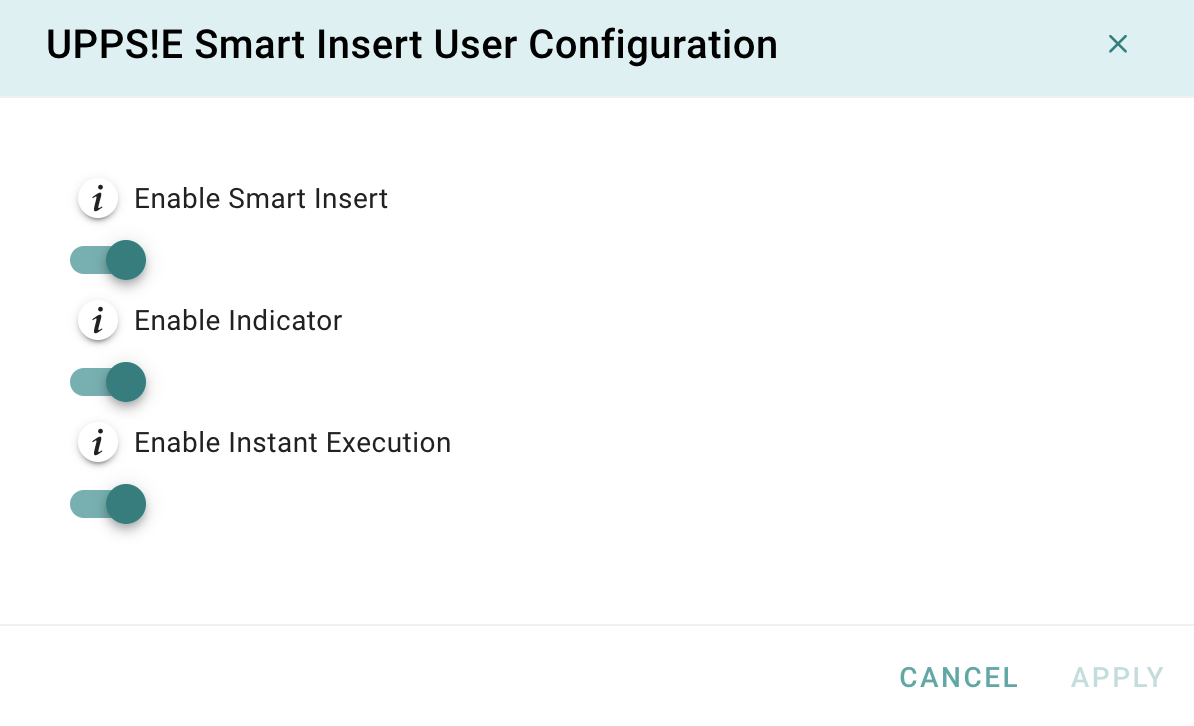 Enable Smart Insert:
Enable Indicator:
- Enables the Smart Insert icon in the Polarion Navigation Header. The icon is highlighted when the cursor is positioned in a text field that supports the Smart Insert.
Enable Instant Execution:
- If enabled, the Smart Insert Menu opens autoatically when a configured group symbol is typed.
- If disabled, the Smart Insert Menu opens only when the
Ctrl + Spacekey combination is pressed. - Starting with Polarion 2512, the character
@is used to insert mentions in rich text fields. To avoid conflicts with the Smart Insert, the Smart Insert menu does not open when@is typed in rich-text fields, even if Instant Execution is enabled.
Settings saved in the User Configuration dialog apply only to the current user and are effective across all projects on the server where the extension is active.
Keine Kommentare vorhanden
Keine Kommentare vorhanden